- Application.use()
- Application.router()
- express核心源碼模擬
一、express.use()
1.1app.use([path,] callback [, callback …])
通過語法結構可以看到Application.use()參數分別有以下幾種情形:
app.use(function(){...}); //給全局添加一个中間件
app.use(path,function(){...}); //給指定路由path添加一个中間件
app.use(function(){...}, function(){...}, ...); //給全局添加n个中間件
app.use(path,function(){...},function(){...}, ...); //給指定路由path添加n个中間件
關於path最簡單也是最常用的就是字符串類型(例:‘/abcd’);除了字符串Express還提供了模板和正則格式(例:’/abc?d‘, ‘/ab+cd‘, ‘/ab\*cd‘, ‘/a(bc)?d‘, ‘/\/abc|\/xyz/‘);除了單個的字符串和模板還可以將多個path作為一個數組的元素,然後將這個數組作為use的path,這樣就可以同時給多個路由添加中間件,詳細內容可以參考官方文檔:https://www.expressjs.com.cn/4x/api.html#path-examples。
關於callbakc多個或單个中間件程序這已經再語法結構中直觀的體現出來了,這裏重點來看看回調函數的參數:
app.use(function(req,res,next){...}); //必須提供的參數
app.use(function(err,req,res,next){...}); //錯誤中間件需要在最前面添加一個錯誤參數
關於中間件的簡單應用:
let express = require('./express');
let app = express();
app.use('/',function(req,res,next){
    console.log("我是一個全局中間件");
    next(); //每个中間件的最末尾必須調用next
});

app.use('/',function(err,req,res,next){
    console.log("我是一個全局錯誤中間,當發生錯誤是調用")
    console.error(err.stack);
    res.status(500).send('服務出錯誤了!');
    //由於這個錯誤處理直接響應了客戶端,可以不再調用next,當然後面還需要處理一些業務的話也是可以調用next的
});
1.2簡單的模擬Express源碼實現Appliction.use()以及各個請求方法的響應註冊方法(這裏個源碼模擬路由概念還比較模糊,所以使用請求方法的響應註冊API,而沒有使用路由描述):
 1 //文件結構
 2 express
 3     index.js
 4 //源碼模擬實現
 5 let http = require("http");
 6 let url = require('url');
 7 function createApplication(){
 8     //app是一個監聽函數
 9     let app = (req,res) =>{
10         //取出每一個層
11         //1.獲取請求的方法
12         let m = req.method.toLowerCase();
13         let {pathname} = url.parse(req.url,true);
14
15         //通過next方法進行迭代
16         let index = 0;
17         function next(err){
18             //如果routes迭代完成還沒有找到,說明路徑不存在
19             if(index === app.routes.length) return res.end(`Cannot ${m} ${pathname}`);
20             let {method, path, handler} = app.routes[index++];//每次調用next就應該取下一個layer
21             if(err){
22                 if(handler.length === 4){
23                     handler(err,req,res,next);
24                 }else{
25                     next(err);
26                 }
27             }else{
28                 if(method === 'middle'){ //處理中間件
29                     if(path === '/' || path === pathname || pathname.startsWith(path+'/')){
30                         handler(req,res,next);
31                     }else{
32                         next();//如果這个中間件沒有匹配到,繼續通過next迭代路由容器routes
33                     }
34                 }else{ //處理路由
35                     if( (method === m || method ==='all') && (path === pathname || path === '*')){ //匹配請求方法和請求路徑(接口)
36                         handler(req,res);//匹配成功后執行的Callback
37                     }else{
38                         next();
39                     }
40                 }
41             }
42         }
43         next();
44     }
45     app.routes = [];//路由容器
46     app.use = function(path,handler){
47         if(typeof handler !== 'function'){
48             handler = path;
49             path = '/';
50         }
51         let layer = {
52             method:'middle', //method是middle就表示它是一个中間件
53             path,
54             handler
55         }
56         app.routes.push(layer);
57     }
58     app.all = function(path,handler){
59         let layer = {
60             method:'all',
61             path,
62             handler
63         }
64         app.routes.push(layer);
65     }
66     console.log(http.METHODS);
67     http.METHODS.forEach(method =>{
68         method = method.toLocaleLowerCase();
69         app[method] = function (path,handler){//批量生成各個請求方法的路由註冊方法
70             let layer = {
71                 method,
72                 path,
73                 handler
74             }
75             app.routes.push(layer);
76         }
77     });
78     //內置中間件,給req擴展path、qury屬性
79     app.use(function(req,res,next){
80         let {pathname,query} = url.parse(req.url,true);
81         let hostname = req.headers['host'].split(':')[0];
82         req.path = pathname;
83         req.query = query;
84         req.hostname = hostname;
85         next();
86     });
87     //通過app.listen調用http.createServer()掛在app(),啟動express服務
88     app.listen = function(){
89         let server = http.createServer(app);
90         server.listen(...arguments);
91     }
92     return app;
93 }
94 module.exports = createApplication;
View Code
測試模擬實現的Express:
 1 let express = require('./express');
 2
 3 let app = express();
 4
 5 app.use('/',function(req,res,next){
 6     console.log("我是一個全局中間件");
 7     next();
 8 });
 9 app.use('/user',function(req,res,next){
10     console.log("我是user接口的中間件");
11     next();
12 });
13 app.get('/name',function(req,res){
14     console.log(req.path,req.query,req.hostname);
15     res.end('zfpx');
16 });
17 app.post('/name',function(req,res){
18     res.end('post name');
19 });
20
21
22 app.all("*",function(req,res){
23     res.end('all');
24 });
25
26 app.use(function(err,req,res,next){
27     console.log(err);
28     next();
29 });
30
31 app.listen(12306);
View Code
在windows系統下測試請求:
關於源碼的構建詳細內容可以參考這個視頻教程:app.use()模擬構建視頻教程,前面就已經說明過這個模式實現僅僅是從表面的業務邏輯,雖然有一點底層的雛形,但與源碼還是相差甚遠,這一部分也僅僅只是想幫助理解Express採用最簡單的方式表現出來。
1.3如果你看過上面的源碼或自己也實現過,就會發現Express關於中間件的添加方式除了app.use()還有app.all()及app.METHOD()。在模擬源碼中我並未就use和all的差異做處理,都是採用了請求路徑絕對等於path,這種方式是all的特性,use的path實際表示為請求路徑的開頭:
app.use(path,callback):path表示請求路徑的開頭部分。
app.all(path,callback):paht表示完全等於請求路徑。
app.METHOD(path,callback):並不是真的有METHOD這個方法,而是指HTTP請求方法,實際上表示的是app.get()、app.post()、app.put()等方法,而有時候我們會將這些方法說成用來註冊路由,這是因為路由註冊的確使用這些方法,但同時這些方法也是可以用作中間的添加,這在前一篇博客中的功能解析中就有說明(Express4.x之API:express),詳細見過後面的路由解析就會更加明了。
二、express.router()
2.1在實例化一個Application時會實例化一個express.router()實例並被添加到app._router屬性上,實際上這個app使用的use、all、METHOD時都是在底層調用了該Router實例上對應的方法,比如看下面這些示例:
 1 let express = require("express");
 2 let app = express();
 3
 4 app._router.use(function(req,res,next){
 5     console.log("--app.router--");
 6     next();
 7 });
 8
 9 app._router.post("/csJSON",function(req,res,next){
10     res.writeHead(200);
11     res.write(JSON.stringify(req.body));
12     res.end();
13 });
14
15 app.listen(12306);
上面示例中的app._router.use、app._router.post分別同等與app.use、app.post,這裏到這裏也就說明了上一篇博客中的路由與Application的關係Express4.x之API:express。
2.2Express中的Router除了為Express.Application提供路由功能以外,Express也將它作為一個獨立的路由工具分離了出來,也就是說Router自身可以獨立作為一個應用,如果我們在實際應用中有相關業務有類似Express.Application的路由需求,可以直接實例化一個Router使用,應用的方式如下:
let express = require('/express');
let router = express.Router();
//這部分可以詳細參考官方文檔有詳細的介紹
2.3由於這篇博客主要是分析Express的中間件及路由的底層邏輯,所以就不在這裏詳細介紹某個模塊的應用,如果有時間我再寫一篇關於Router模塊的應用,這裏我直接上一份模擬Express路由的代碼以供參考:
文件結構:
express //根路徑
    index.js //express主入口文件
    application.js //express應用構造模塊
    router //路由路徑
        index.js //路由主入口文件
        layer.js //構造層的模塊
        route.js //子路由模塊
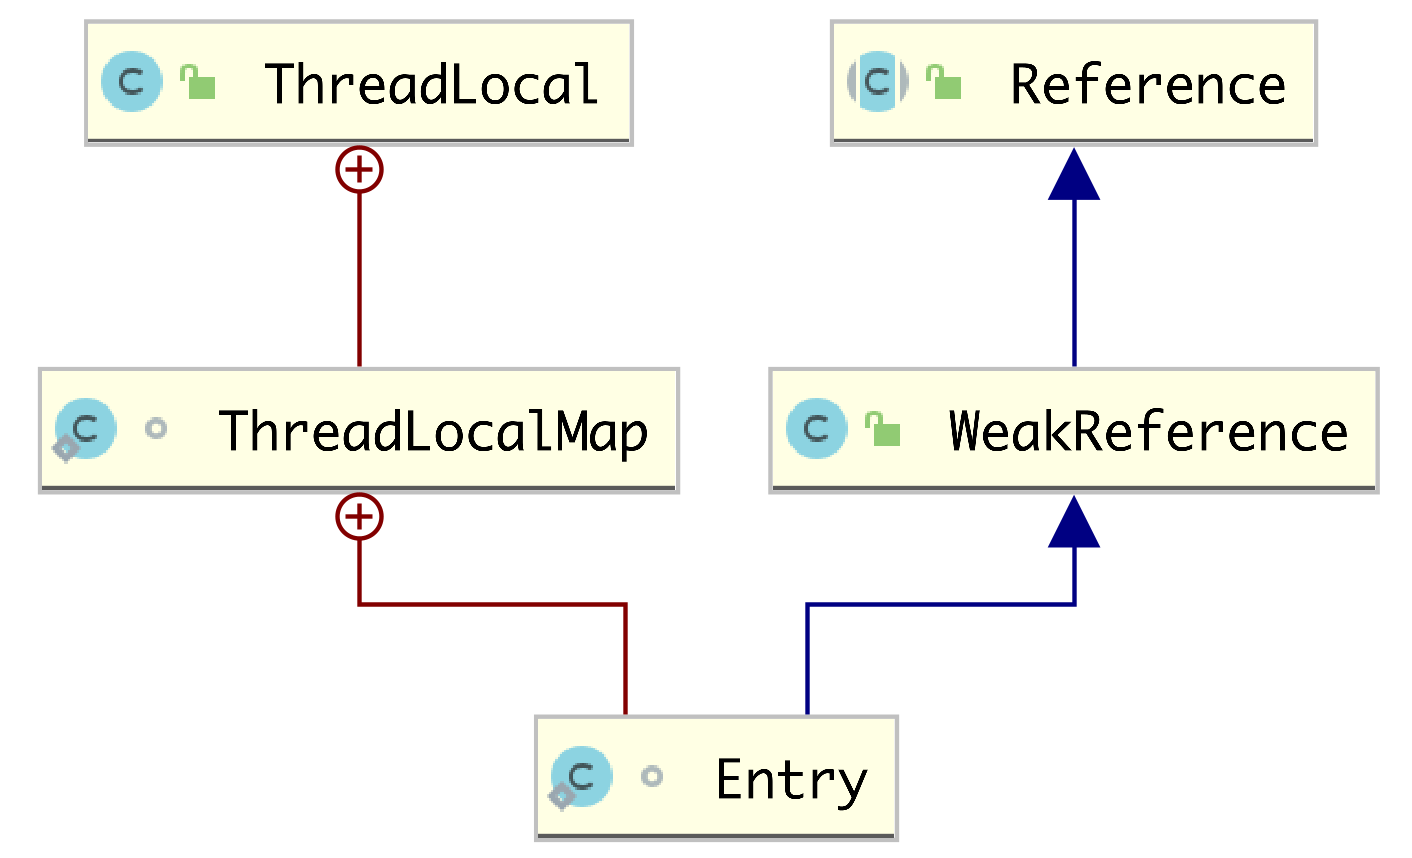
Express路由系統的邏輯結構圖:
模擬代碼(express核心源碼模擬):
1 //express主入口文件
2 let Application = require('./application.js');
3
4 function createApplication(){
5     return new Application();
6 }
7
8 module.exports = createApplication;
index.js //express主入口文件
 1 //用來創建應用app
 2 let http = require('http');
 3 let url = require('url');
 4
 5 //導入路由系統模塊
 6 let Router = require('./router');
 7
 8 const methods = http.METHODS;
 9
10 //Application ---- express的應用系統
11 function Application(){
12     //創建一個內置的路由系統
13     this._router = new Router();
14 }
15
16 //app.get ---- 實現路由註冊業務
17 // Application.prototype.get = function(path,...handlers){
18 //     this._router.get(path,'use',handlers);
19 // }
20
21 methods.forEach(method => {
22     method = method.toLocaleLowerCase();
23     Application.prototype[method] = function(path,...handlers){
24         this._router[method](path,handlers);
25     }
26 });
27
28 //app.use ---- 實現中間件註冊業務
29 //這裏模擬處理三種參數模式:
30 // -- 1個回調函數:callback
31 // -- 多個回調函數:[callback,] callback [,callback...]
32 // -- 指定路由的中間件:[path,] callback [,callback...]
33 // -- 注意源碼中可以處理這三種參數形式還可以處理上面數據的數組形式,以及其他Application(直接將其他app上的中間件添加到當前應用上)
34 Application.prototype.use = function(fn){
35     let path = '/';
36     let fns = [];
37     let arg = [].slice.call(arguments);
38     if(typeof fn !== 'function' && arg.length >= 2){
39         if(typeof arg[0] !== 'string'){
40             fns = arg;
41         }else{
42             path = arg[0];
43             fns = arg.slice(1);
44         }
45     }else{
46         fns = arg;
47     }
48     this._router.use(path,'use',fns);
49 }
50
51 Application.prototype.all = function(fn){
52     let path = '/';
53     let fns = [];
54     let arg = [].slice.call(arguments);
55     if(typeof fn !== 'function' && arg.length >= 2){
56         if(typeof arg[0] !== 'string'){
57             fns = arg;
58         }else{
59             path = arg[0];
60             fns = arg.slice(1);
61         }
62       }else{
63         fns = arg;
64     }
65     this._router.use(path,'all',fns);
66 }
67
68 //將http的listen方法封裝到Application的原型上
69 Application.prototype.listen = function(){
70     let server = http.createServer((req,res)=>{
71         //done 用於當路由無任何可匹配項時調用的處理函數
72         function done(){
73             res.end(`Cannot ${req.url} ${req.method}`);
74         }
75         this._router.handle(req,res,done); //調用路由系統的handle方法處理請求
76     });
77     server.listen(...arguments);
78 };
79
80 module.exports = Application;
application.js //express應用構造模塊
 1 //express路由系統
 2 const Layer = require('./layer.js');
 3 const Route = require('./route.js');
 4
 5 const http = require('http');
 6 const methods = http.METHODS;
 7
 8 const url = require('url');
 9
10
11 //路由對象構造函數
12 function Router(){
13     this.stack = [];
14 }
15
16 //router.route ---- 用於創建子路由對象route與主路由上層(layer)的關係
17 //並將主路由上的層緩存到路由對象的stack容器中,該層建立路徑與子路由處理請求的關係
18 Router.prototype.route = function(path){
19     let route = new Route();
20     let layer = new Layer(path,route.dispatch.bind(route));
21     this.stack.push(layer);
22     return route;
23 }
24
25 //router.get ---- 實現路由註冊
26 //實際上這個方法調用router.route方法分別創建一個主路由系統層、一個子路由系統,並建立兩者之間的關係,詳細見Router.prototype.route
27 //然後獲取子路由系統對象,並將回調函數和請求方法註冊在這個子路由系統上
28
29
30 // Router.prototype.get = function(path,handlers){
31 //     let route = this.route(path);
32 //     route.get(handlers);
33 // }
34
35 methods.forEach(method =>{
36     method = method.toLocaleLowerCase();
37     //注意下面這個方法會出現內存泄漏問題,有待改進
38     Router.prototype[method] = function(path, handlers){
39         let route = this.route(path);
40         route[method](handlers);
41     }
42 });
43
44 //router.use ---- 實現中間件註冊(按照路由開頭的路徑匹配,即相對路由匹配)
45 Router.prototype.use = function(path,routerType,fns){
46     let router = this;
47     fns.forEach(function(fn){
48         let layer = new Layer(path,fn);
49         layer.middle = true; //標記這個層為相對路由中間件
50         layer.routerType = routerType;
51         router.stack.push(layer);
52     });
53 }
54
55 //調用路由處理請求
56 Router.prototype.handle = function(req,res,out){
57     let {pathname} = url.parse(req.url);
58     let index = 0;
59     let next = () => {
60         if(index >= this.stack.length) return out();
61         let layer = this.stack[index++];
62         if(layer.middle && (layer.path === '/' || pathname === layer.path || pathname.startsWith(layer.path + '/'))){
63             //處理中間件
64             if(layer.routerType === 'use'){
65                 layer.handle_request(req,res,next);
66             }else if(layer.routerType === 'all' && layer.path === pathname){
67                 layer.handle_request(req,res,next);
68             }else{
69                 next();
70             }
71         }else if(layer.match(pathname)){
72             //處理響應--更準確的說是處理具體請求方法上的中間件或響應
73             layer.handle_request(req,res,next);
74         }else{
75             next();
76         }
77     }
78     next();
79 }
80
81 module.exports = Router;
index.js //路由主入口文件
 1 //Layer的構造函數
 2 function Layer(path,handler){
 3     this.path = path; //當前層的路徑
 4     this.handler = handler;  //當前層的回調函數
 5 }
 6
 7 //判斷請求方法與當前層的方法是否一致
 8 Layer.prototype.match = function(pathname){
 9     return this.path === pathname;
10 }
11
12 //調用當前層的回調函數handler
13 Layer.prototype.handle_request = function(req,res,next){
14     this.handler(req,res,next);
15 }
16
17 module.exports = Layer;
layer.js //構造層的模塊
 1 //Layer的構造函數
 2 function Layer(path,handler){
 3     this.path = path; //當前層的路徑
 4     this.handler = handler;  //當前層的回調函數
 5 }
 6
 7 //判斷請求方法與當前層的方法是否一致
 8 Layer.prototype.match = function(pathname){
 9     return this.path === pathname;
10 }
11
12 //調用當前層的回調函數handler
13 Layer.prototype.handle_request = function(req,res,next){
14     this.handler(req,res,next);
15 }
16
17 module.exports = Layer;
route.js //子路由模塊
測試代碼:
 1 let express = require('./express');
 2 let app = express();
 3
 4
 5 app.use('/name',function(req,res,next){
 6     console.log('use1');
 7     next();
 8 });
 9 app.use(function(req,res,next){
10     console.log('use2-1');
11     next();
12 },function(req,res,next){
13     console.log('use2-2');
14     next();
15 });
16
17 app.all('/name',function(req,res,next){
18     console.log('all-1');
19     next();
20 });
21 app.all('/name/app',function(req,res,next){
22     console.log('all-2');
23     next();
24 });
25
26 app.get('/name/app',function(req,res){
27     res.end(req.url);
28 });
29 // console.log(app._router.stack);
30 app.listen(12306);
View Code
測試結果:
本站聲明:網站內容來源於博客園,如有侵權,請聯繫我們,我們將及時處理
【其他文章推薦】
※網頁設計一頭霧水該從何著手呢? 台北網頁設計公司幫您輕鬆架站!
※網頁設計公司推薦不同的風格,搶佔消費者視覺第一線
※想知道購買電動車哪裡補助最多?台中電動車補助資訊懶人包彙整
※南投搬家公司費用,距離,噸數怎麼算?達人教你簡易估價知識!
※教你寫出一流的銷售文案?
※超省錢租車方案