Eeporter是什麼及來源?
是什麼?
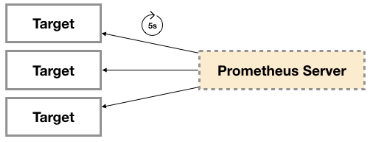
廣義上講所有可以向Prometheus提供監控樣本數據的程序都可以被稱為一個Exporter。而Exporter的一個實例稱為target,如下所示,Prometheus通過輪詢的方式定期從這些target中獲取樣本數據:
來源有哪些?
社區提供的
Prometheus社區提供了豐富的Exporter實現,涵蓋了從基礎設施,中間件以及網絡等各個方面的監控功能。這些Exporter可以實現大部分通用的監控需求。下錶列舉一些社區中常用的Exporter:
| 範圍 | 常用Exporter |
|---|---|
| 數據庫 | MySQL Exporter, Redis Exporter, MongoDB Exporter, MSSQL Exporter等 |
| 硬件 | Apcupsd Exporter,IoT Edison Exporter, IPMI Exporter, Node Exporter等 |
| 消息隊列 | Beanstalkd Exporter, Kafka Exporter, NSQ Exporter, RabbitMQ Exporter等 |
| 存儲 | Ceph Exporter, Gluster Exporter, HDFS Exporter, ScaleIO Exporter等 |
| HTTP服務 | Apache Exporter, HAProxy Exporter, Nginx Exporter等 |
| API服務 | AWS ECS Exporter, Docker Cloud Exporter, Docker Hub Exporter, GitHub Exporter等 |
| 日誌 | Fluentd Exporter, Grok Exporter等 |
| 監控系統 | Collectd Exporter, Graphite Exporter, InfluxDB Exporter, Nagios Exporter, SNMP Exporter等 |
| 其他 | Blockbox Exporter, JIRA Exporter, Jenkins Exporter, Confluence Exporter等 |
用戶自定義的
除了直接使用社區提供的Exporter程序以外,用戶還可以基於Prometheus提供的Client Library創建自己的Exporter程序,目前Promthues社區官方提供了對以下編程語言的支持:Go、Java/Scala、Python、Ruby。同時還有第三方實現的如:Bash、C++、Common Lisp、Erlang,、Haskeel、Lua、Node.js、PHP、Rust等。
Exporter的運行方式
從Exporter的運行方式來講,又可以分為
獨立使用的
以我們已經使用過的Node Exporter為例,由於操作系統本身並不直接支持Prometheus,同時用戶也無法通過直接從操作系統層面上提供對Prometheus的支持。因此,用戶只能通過獨立運行一個程序的方式,通過操作系統提供的相關接口,將系統的運行狀態數據轉換為可供Prometheus讀取的監控數據。 除了Node Exporter以外,比如MySQL Exporter、Redis Exporter等都是通過這種方式實現的。 這些Exporter程序扮演了一个中間代理人的角色。
集成到應用中的
為了能夠更好的監控系統的內部運行狀態,有些開源項目如Kubernetes,ETCD等直接在代碼中使用了Prometheus的Client Library,提供了對Prometheus的直接支持。這種方式打破的監控的界限,讓應用程序可以直接將內部的運行狀態暴露給Prometheus,適合於一些需要更多自定義監控指標需求的項目。
Exporter規範
所有的Exporter程序都需要按照Prometheus的規範,返回監控的樣本數據。以Node Exporter為例,當訪問/metrics地址時會返回以下內容:
# HELP node_cpu Seconds the cpus spent in each mode.
# TYPE node_cpu counter
node_cpu{cpu="cpu0",mode="idle"} 362812.7890625
# HELP node_load1 1m load average.
# TYPE node_load1 gauge
node_load1 3.0703125
這是一種基於文本的格式規範,在Prometheus 2.0之前的版本還支持Protocol buffer規範。相比於Protocol buffer文本具有更好的可讀性,以及跨平台性。Prometheus 2.0的版本也已經不再支持Protocol buffer。
Exporter返回的樣本數據,主要由三個部分組成:樣本的一般註釋信息(HELP),樣本的類型註釋信息(TYPE)和樣本。Prometheus會對Exporter響應的內容逐行解析:
如果當前行以# HELP開始,Prometheus將會按照以下規則對內容進行解析,得到當前的指標名稱以及相應的說明信息:
# HELP <metrics_name> <doc_string>
如果當前行以# TYPE開始,Prometheus會按照以下規則對內容進行解析,得到當前的指標名稱以及指標類型:
# TYPE <metrics_name> <metrics_type>
TYPE註釋行必須出現在指標的第一個樣本之前。如果沒有明確的指標類型需要返回為untyped。 除了# 開頭的所有行都會被視為是監控樣本數據。 每一行樣本需要滿足以下格式規範:
metric_name [
  "{" label_name "=" `"` label_value `"` { "," label_name "=" `"` label_value `"` } [ "," ] "}"
] value [ timestamp ]
其中metric_name和label_name必須遵循PromQL的格式規範要求。value是一個float格式的數據,timestamp的類型為int64(從1970-01-01 00:00:00以來的毫秒數),timestamp為可選默認為當前時間。具有相同metric_name的樣本必須按照一個組的形式排列,並且每一行必須是唯一的指標名稱和標籤鍵值對組合。
需要特別注意的是對於histogram和summary類型的樣本。需要按照以下約定返回樣本數據:
1 . 類型為summary或者histogram的指標x,該指標所有樣本的值的總和需要使用一個單獨的x_sum指標表示
2 . 類型為summary或者histogram的指標x,該指標所有樣本的總數需要使用一個單獨的x_count指標表示。
3 . 對於類型為summary的指標x,其不同分位數quantile所代表的樣本,需要使用單獨的x{quantile=”y”}表示。
4 . 對於類型histogram的指標x為了表示其樣本的分佈情況,每一個分佈需要使用x_bucket{le=”y”}表示,其中y為當前分佈的上位數。同時必須包含一個樣本x_bucket{le=”+Inf”},並且其樣本值必須和x_count相同。
5 . 對於histogram和summary的樣本,必須按照分位數quantile和分佈le的值的遞增順序排序。
以下是類型為histogram和summary的樣本輸出示例
# A histogram, which has a pretty complex representation in the text format:
# HELP http_request_duration_seconds A histogram of the request duration.
# TYPE http_request_duration_seconds histogram
http_request_duration_seconds_bucket{le="0.05"} 24054
http_request_duration_seconds_bucket{le="0.1"} 33444
http_request_duration_seconds_bucket{le="0.2"} 100392
http_request_duration_seconds_bucket{le="+Inf"} 144320
http_request_duration_seconds_sum 53423
http_request_duration_seconds_count 144320

# Finally a summary, which has a complex representation, too:
# HELP rpc_duration_seconds A summary of the RPC duration in seconds.
# TYPE rpc_duration_seconds summary
rpc_duration_seconds{quantile="0.01"} 3102
rpc_duration_seconds{quantile="0.05"} 3272
rpc_duration_seconds{quantile="0.5"} 4773
rpc_duration_seconds_sum 1.7560473e+07
rpc_duration_seconds_count 2693
指定樣式格式的版本
在Exporter響應的HTTP頭信息中,可以通過Content-Type指定特定的規範版本,例如:
HTTP/1.1 200 OK
Content-Encoding: gzip
Content-Length: 2906
Content-Type: text/plain; version=0.0.4
Date: Sat, 17 Mar 2018 08:47:06 GMT
其中version用於指定Text-based的格式版本,當沒有指定版本的時候,默認使用最新格式規範的版本。同時HTTP響應頭還需要指定壓縮格式為gzip。
容器監控
Docker是一個開源的應用容器引擎,讓開發者可以打包他們的應用以及依賴包到一個可移植的容器中,然後發布到任何流行的Linux/Windows/Mac機器上。容器鏡像正成為一個新的標準化軟件交付方式。
例如,可以通過一下命令快速在本地啟動一個Nginx服務:
安裝docker
# 安裝一些必要的系統工具
sudo yum install -y yum-utils device-mapper-persistent-data lvm2
# 添加軟件源信息
# docker 官方源
sudo yum-config-manager --add-repo https://download.docker.com/linux/centos/docker-ce.repo

# 阿里雲源
sudo yum-config-manager --add-repo http://mirrors.aliyun.com/docker-ce/linux/centos/docker-ce.repo

sudo yum makecache fast

# CentOS7安裝 Docker-ce
yum -y install docker-ce


mkdir /etc/docker
vim /etc/docker/daemon.json
{
"registry-mirrors": ["https://registry.docker-cn.com"]
}

# 啟動Docker後台服務
systemctl start docker && systemctl enable docker
systemctl daemon-reload                 # 守護進程重啟

# 運行一個nginx做測試
docker run -itd nginx
為了能夠獲取到Docker容器的運行狀態,用戶可以通過Docker的stats命令獲取到當前主機上運行容器的統計信息,可以查看容器的CPU利用率、內存使用量、網絡IO總量以及磁盤IO總量等信息。
docker stats
CONTAINER           CPU %      MEM USAGE / LIMIT     MEM %      NET I/O         BLOCK I/O   PIDS
9a1648bec3b2        0.30%      196KiB / 3.855GiB     0.00%      828B / 0B       827kB / 0B  1
# 除了使用命令以外,用戶還可以通過docker提供的http api查看容器的監控統計信息.
使用CAdvisor
CAdvisor是Google開源的一款用於展示和分析容器運行狀態的可視化工具。通過在主機上運行CAdvisor用戶可以輕鬆的獲取到當前主機上容器的運行統計信息,並以圖表的形式向用戶展示。
在本地運行CAdvisor也非常簡單,直接運行一下命令即可:
docker run \
  --volume=/:/rootfs:ro \
  --volume=/var/run:/var/run:rw \
  --volume=/sys:/sys:ro \
  --volume=/var/lib/docker/:/var/lib/docker:ro \
  --publish=8080:8080 \
  --detach=true \
  --name=cadvisor \
  google/cadvisor:latest
# 通過訪問http://localhost:8080可以查看,當前主機上容器的運行狀態.
CAdvisor是一個簡單易用的工具,相比於使用Docker命令行工具,用戶不用再登錄到服務器中即可以可視化圖表的形式查看主機上所有容器的運行狀態。
而在多主機的情況下,在所有節點上運行一個CAdvisor再通過各自的UI查看監控信息顯然不太方便,同時CAdvisor默認只保存2分鐘的監控數據。好消息是CAdvisor已經內置了對Prometheus的支持。訪問http://localhost:8080/metrics即可獲取到標準的Prometheus監控樣本輸出:
下面列舉了一些CAdvisor中獲取的典型監控指標
| 指標名稱 | 類型 | 含義 |
|---|---|---|
| gauge | 再過去10秒內容器CPU的平均負載 | |
| container_cpu_usage_seconds_total |
| 指標名稱 | 類型 | 含義 |
|---|---|---|
| container_cpu_load_average_10s | gauge | 過去10秒內容器CPU的平均負載 |
| container_cpu_usage_seconds_total | counter | 容器在每個CPU內核上的累積佔用時間 (單位:秒) |
| container_cpu_system_seconds_total | counter | System CPU累積佔用時間(單位:秒) |
| container_cpu_user_seconds_total | counter | User CPU累積佔用時間(單位:秒) |
| container_fs_usge_bytes | gauge | 容器中文件系統的使用量(單位:字節) |
| container_network_receive_bytes_total | counter | 容器網絡累計接受數據總量(單位: 字節) |
| container_network_transmit_bytes_total | counter | 容器網絡累計傳輸數據總量(單位: 字節) |
與Prometheus集成
修改/etc/prometheus/prometheus.yml,將cAdvisor添加監控數據採集任務目標當中:
  - job_name: 'docker'
    static_configs:
    - targets: ['172.19.0.27:8080']

systemctl restart prometheus
啟動Prometheus服務,可以在Prometheus UI中看到當前所有的Target狀態:
當能夠正常採集到cAdvisor的樣本數據后,可以通過一下錶達式計算容器的CPU使用率.
sum(irate(container_cpu_usage_seconds_total{image!=""}[1m])) without (cpu)
查詢容器內存使用量(單位: 字節)
container_memory_usage_bytes{image!=""}
查詢容器網絡接收量速率(單位: 字節/秒)
sum(rate(container_network_receive_bytes_total{image!=""}[1m])) without (interface)
查詢容器網絡傳輸量速率
sum(rate(container_network_transmit_bytes_total{image!=""}[1m])) without (interface)
查詢容器文件系統讀取速率
sum(rate(container_fs_reads_bytes_total{image!=""}[1m])) without (device)

# 為了方便看出效果,我們使用dd命令
docker exec -it 628d /bin/bash
dd if=/dev/zero of=test bs=1M count=1000
- 查詢容器文件系統寫入速率(單位: 字節/秒)
sum(rate(container_fs_writes_bytes_total{image!=""}[1m])) without (device)
Prometheus網絡探測
接下來我們主要介紹Prometheus下如何進行白盒監控,我們之前監控主機的資源用量、容器的運行狀態、數據庫中間件的運行數據。 這些都是支持業務和服務的基礎設施,通過白盒能夠了解其內部的實際運行狀態,通過對監控指標的觀察能夠預判可能出現的問題,從而對潛在的不確定因素進行優化。而從完整的監控邏輯的角度,除了大量的應用白盒監控以外,還應該添加適當的黑盒監控。
黑盒監控即以用戶的身份測試服務的外部可見性,常見的黑盒監控包括HTTP探針、TCP探針等用於檢測站點或者服務的可訪問性,以及訪問效率等。黑盒監控相較於白盒監控最大的不同在於黑盒監控是以故障為導向當故障發生時,黑盒監控能快速發現故障,而白盒監控則側重於主動發現或者預測潛在的問題。一個完善的監控目標是要能夠從白盒的角度發現潛在問題,能夠在黑盒的角度快速發現已經發生的問題。
安裝Blackbox Exporter
Blackbox Exporter是Prometheus社區提供的官方黑盒監控解決方案,其允許用戶通過:HTTP、HTTPS、DNS、TCP以及ICMP的方式對網絡進行探測。用戶可以直接使用go get命令獲取Blackbox Exporter源碼並生成本地可執行文件:
下載安裝blackbox_exporter
wget https://github.com/prometheus/blackbox_exporter/releases/download/v0.16.0/blackbox_exporter-0.16.0.linux-amd64.tar.gz
tar xvf blackbox_exporter-0.16.0.linux-amd64.tar.gz -C /usr/local/prometheus/
mv blackbox_exporter-0.16.0.linux-amd64/ blackbox_exporter
useradd prometheus
chown -R prometheus:prometheus /usr/local/prometheus/

vim /usr/lib/systemd/system/blackbox_exporter.service
[Unit]
Description=blackbox_exporter
After=network.target

[Service]
Type=simple
User=prometheus
ExecStart=/usr/local/prometheus/blackbox_exporter/blackbox_exporter --config.file=/usr/local/prometheus/blackbox_exporter/blackbox.yml
Restart=on-failure

[Install]
WantedBy=multi-user.target

systemctl enable blackbox_exporter.service
systemctl start blackbox_exporter.service
運行Blackbox Exporter時,需要用戶提供探針的配置信息,這些配置信息可能是一些自定義的HTTP頭信息,也可能是探測時需要的一些TSL配置,也可能是探針本身的驗證行為。在Blackbox Exporter每一個探針配置稱為一個module,並且以YAML配置文件的形式提供給Blackbox Exporter。 每一個module主要包含以下配置內容,包括探針類型(prober)、驗證訪問超時時間(timeout)、以及當前探針的具體配置項:
# 探針類型:http、 tcp、 dns、 icmp.
prober: <prober_string>
# 超時時間
[ timeout: <duration> ]
# 探針的詳細配置,最多只能配置其中的一個
[ http: <http_probe> ]
[ tcp: <tcp_probe> ]
[ dns: <dns_probe> ]
[ icmp: <icmp_probe> ]
下面是一個簡化的探針配置文件blockbox.yml,包含兩個HTTP探針配置項
modules:
  http_2xx:
    prober: http
    http:
      method: GET
  http_post_2xx:
    prober: http
    http:
      method: POST
通過運行一下命令,並指定使用的探針設置文件啟動Blockbox Exporter實例:
blackbox_exporter --config.file=/etc/prometheus/blackbox.yml
or
systemctl restart blackbox_exporter.service
啟動成功后,就可以通過訪問http://172.19.0.27:9115/probe?module=http_2xx&target=baidu.com對baidu.com進行探測。這裏通過在URL中提供module參數指定了當前使用的探針,target參數指定探測目標,探針的探測結果通過Metrics的形式返回:
# HELP probe_dns_lookup_time_seconds Returns the time taken for probe dns lookup in seconds
# TYPE probe_dns_lookup_time_seconds gauge
probe_dns_lookup_time_seconds 0.004359875
# HELP probe_duration_seconds Returns how long the probe took to complete in seconds
# TYPE probe_duration_seconds gauge
probe_duration_seconds 0.046153996
# HELP probe_failed_due_to_regex Indicates if probe failed due to regex
# TYPE probe_failed_due_to_regex gauge
probe_failed_due_to_regex 0
# HELP probe_http_content_length Length of http content response
# TYPE probe_http_content_length gauge
probe_http_content_length 81
# HELP probe_http_duration_seconds Duration of http request by phase, summed over all redirects
# TYPE probe_http_duration_seconds gauge
probe_http_duration_seconds{phase="connect"} 0.00105657
probe_http_duration_seconds{phase="processing"} 0.039457402
probe_http_duration_seconds{phase="resolve"} 0.004359875
probe_http_duration_seconds{phase="tls"} 0
probe_http_duration_seconds{phase="transfer"} 0.000337184
# HELP probe_http_last_modified_timestamp_seconds Returns the Last-Modified HTTP \
response header in unixtime
# TYPE probe_http_last_modified_timestamp_seconds gauge
probe_http_last_modified_timestamp_seconds 1.26330408e+09
# HELP probe_http_redirects The number of redirects
# TYPE probe_http_redirects gauge
probe_http_redirects 0
# HELP probe_http_ssl Indicates if SSL was used for the final redirect
# TYPE probe_http_ssl gauge
probe_http_ssl 0
# HELP probe_http_status_code Response HTTP status code
# TYPE probe_http_status_code gauge
probe_http_status_code 200
# HELP probe_http_uncompressed_body_length Length of uncompressed response body
# TYPE probe_http_uncompressed_body_length gauge
probe_http_uncompressed_body_length 81
# HELP probe_http_version Returns the version of HTTP of the probe response
# TYPE probe_http_version gauge
probe_http_version 1.1
# HELP probe_ip_protocol Specifies whether probe ip protocol is IP4 or IP6
# TYPE probe_ip_protocol gauge
probe_ip_protocol 4
# HELP probe_success Displays whether or not the probe was a success
# TYPE probe_success gauge
probe_success 1
從返回的樣本中,用戶可以獲取站點的DNS解析耗時,站點響應時間,HTTP響應狀態碼等等和站點訪問質量相關的監控指標,從而幫助管理員主動的發現故障和問題.
Prometheus集成
接下來,只需要在Prometheus下配置對Blockbox Exporter實例的採集任務即可、最直觀的配置方式.
  - job_name: 'baidu_http2xx_probe'
    params:
      module:
      - http_2xx
      target:
      - baidu.com
    metrics_path: /probe
    static_configs:
    - targets: ['172.19.0.27:9115']

  - job_name: 'prometheus_http2xx_probe'
    params:
      module:
      - http_2xx
      target:
      - prometheus.io
    metrics_path: /probe
    static_configs:
    - targets: ['172.19.0.27:9115']

systemctl restart prometheus
這裏分別配置了名為baidu_http2x_probe和prometheus_http2xx_probe的採集任務,並且通過params指定使用的探針(module)以及探測目標(target).
那問題就來了,假如我們有N個目標站點且都需要M種探測方式,那麼Prometheus中將包含N * M個採集任務,從配置管理的角度來說顯然是不可接受的。這裏我們也可以採用Relabling的方式對這些配置進行簡化,配置方式如下:
  - job_name: 'blackbox'
    metrics_path: /probe
    params:
      module: [http_2xx]
    static_configs:
      - targets:
        - http://prometheus.io    # Target to probe with http.
        - https://prometheus.io   # Target to probe with https.
        - http://example.com:8080 # Target to probe with http on port 8080.
    relabel_configs:
      - source_labels: [__address__]
        target_label: __param_target
      - source_labels: [__param_target]
        target_label: instance
      - target_label: __address__
        replacement: 172.19.0.27:9115
這裏針對每一個探針服務(如http_2xx)定義一個採集任務,並且直接將任務的採集目標定義為我們需要探測的站點,在採集樣本數據之前通過relabel_configs對採集任務進行動態配置.
* 第一步, 根據Target實例的地址,寫入__param_target標籤中,__param_<name>形式的標籤來表示,
	# 在採集任務時會在請求目標地址中添加<name>參數,等同於params的設置.
* 第二步,  獲取__param_target的值,並覆寫到instance標籤中.
* 第三步,  覆寫Target實例的__address__標籤值為BlockBox Exporter實例的訪問地址.
HTTP探針
HTTP探針是進行黑盒監控時最常用的探針之一,通過HTTP探針能夠網站或者HTTP服務建立有效的監控,包括其本身的可用性,以及用戶體驗相關的如響應時間等等。除了能夠在服務出現異常的時候及時報警,還能幫助系統管理員分析和優化網站體驗。
Blockbox Exporter中所有的探針均是以Module的信息進行配置。如下所示,配置了一個最簡單的HTTP探針:
modules:
  http_2xx_example:
    prober: http
    http:
通過prober配置項指定探針類型。配置項http用於自定義探針的探測方式,這裡有沒對http配置項添加任何配置,表示完全使用HTTP探針的默認配置,該探針將使用HTTP GET的方式對目標服務進行探測,並且驗證返回狀態碼是否為2XX,是則表示驗證成功,否則失敗。
自定義HTTP請求
HTTP服務通常會以不同的形式對外展現,有些可能就是一些簡單的網頁,而有些則可能是一些基於REST的API服務。 對於不同類型的HTTP的探測需要管理員能夠對HTTP探針的行為進行更多的自定義設置,包括:HTTP請求方法、HTTP頭信息、請求參數等。對於某些啟用了安全認證的服務還需要能夠對HTTP探測設置相應的Auth支持。對於HTTPS類型的服務還需要能夠對證書進行自定義設置。
如下所示,這裏通過method定義了探測時使用的請求方法,對於一些需要請求參數的服務,還可以通過headers定義相關的請求頭信息,使用body定義請求內容:
http_post_2xx:
    prober: http
    timeout: 5s
    http:
      method: POST
      headers:
        Content-Type: application/json
      body: '{}'
如果HTTP服務啟用了安全認證,Blockbox Exporter內置了對basic_auth的支持,可以直接設置相關的認證信息即可:
http_basic_auth_example:
    prober: http
    timeout: 5s
    http:
      method: POST
      headers:
        Host: "login.example.com"
      basic_auth:
        username: "username"
        password: "mysecret"
對於使用了Bear Token的服務也可以通過bearer_token配置項直接指定令牌字符串,或者通過bearer_token_file指定令牌文件。
對於一些啟用了HTTPS的服務,但是需要自定義證書的服務,可以通過tls_config指定相關的證書信息:
 http_custom_ca_example:
    prober: http
    http:
      method: GET
      tls_config:
        ca_file: "/certs/my_cert.crt"
- 自定義探針行為
- 在默認情況下HTTP探針只會對HTTP返回狀態碼進行校驗,如果狀態碼為2XX(200 <= StatusCode < 300)則表示探測成功,並且探針返回的指標probe_success值為1。
- 如果用戶需要指定HTTP返回狀態碼,或者對HTTP版本有特殊要求,如下所示,可以使用valid_http_versions和valid_status_codes進行定義:
  http_2xx_example:
    prober: http
    timeout: 5s
    http:
      valid_http_versions: ["HTTP/1.1", "HTTP/2"]
      valid_status_codes: []
默認情況下,Blockbox返回的樣本數據中也會包含指標probe_http_ssl,用於表明當前探針是否使用了SSL:
# HELP probe_http_ssl Indicates if SSL was used for the final redirect
# TYPE probe_http_ssl gauge
probe_http_ssl 0
而如果用戶對於HTTP服務是否啟用SSL有強制的標準。則可以使用fail_if_ssl和fail_if_not_ssl進行配置。fail_if_ssl為true時,表示如果站點啟用了SSL則探針失敗,反之成功。fail_if_not_ssl剛好相反。
  http_2xx_example:
    prober: http
    timeout: 5s
    http:
      valid_status_codes: []
      method: GET
      no_follow_redirects: false
      fail_if_ssl: false
      fail_if_not_ssl: false
除了基於HTTP狀態碼,HTTP協議版本以及是否啟用SSL作為控制探針探測行為成功與否的標準以外,還可以匹配HTTP服務的響應內容。使用fail_if_matches_regexp和fail_if_not_matches_regexp用戶可以定義一組正則表達式,用於驗證HTTP返回內容是否符合或者不符合正則表達式的內容。
  http_2xx_example:
    prober: http
    timeout: 5s
    http:
      method: GET
      fail_if_matches_regexp:
        - "Could not connect to database"
      fail_if_not_matches_regexp:
        - "Download the latest version here"
最後需要提醒的時,默認情況下HTTP探針會走IPV6的協議。 在大多數情況下,可以使用preferred_ip_protocol=ip4強制通過IPV4的方式進行探測。在Bloackbox響應的監控樣本中,也會通過指標probe_ip_protocol,表明當前的協議使用情況:
# HELP probe_ip_protocol Specifies whether probe ip protocol is IP4 or IP6
# TYPE probe_ip_protocol gauge
probe_ip_protocol 6
除了支持對HTTP協議進行網絡探測以外,Blackbox還支持對TCP、DNS、ICMP等其他網絡協議![]
本站聲明:網站內容來源於博客園,如有侵權,請聯繫我們,我們將及時處理
【其他文章推薦】
※回頭車貨運收費標準
※產品缺大量曝光嗎?你需要的是一流包裝設計!
※自行創業缺乏曝光? 網頁設計幫您第一時間規劃公司的形象門面
※推薦評價好的iphone維修中心
※教你寫出一流的銷售文案?
※台中搬家公司教你幾個打包小技巧,輕鬆整理裝箱!
※台中搬家遵守搬運三大原則,讓您的家具不再被破壞!